In this Photoshop tutorial, we'll look at palettes, part of Photoshop's user interface.

Photoshop's Layers Palette
Photoshop's palettes are one of the main ways Photoshop has of communicating with us, and us with it. They are how we interact with the program. Photoshop may be a powerful image editing and painting program, capable of twisting reality and bringing a virtual canvas to our imagination, but without palettes, all of its power and capabilities would be useless to us. It would be like having a sports car without tires, a camera without a shutter release button, or even, I dare say it, a high definition flat screen plasma tv without a remote control!
You get the picture (no pun intended). Photoshop's palettes are what give us access to Photoshop's power. And just as Photoshop has no shortage of power, it seems to have no shortage of palettes, either. As of Photoshop CS2, there's 19 palettes listed under the Window Menu in the Menu Bar at the top of the screen. Some are palettes you'll use every time you use Photoshop, like the Layers palette, the History palette, and of course, the Tools palette which is where each of Photoshop's tools can be found. Others, like the Animations palette (new in Photoshop CS2) and Navigator palette, you probably won't use that often, depending on what sort of work you're doing, of course. A photo retoucher most likely would have no use for the Animations palette, while a web designer would.
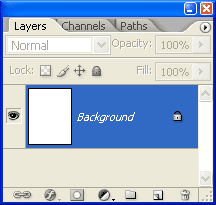
By default, the area on the right of the screen is where you'll find several of Photoshop's palettes already open and ready to help us work when we open up the program. This area is commonly referred to as the Palette Row or Palette Alley, and the palettes that Photoshop opens for us here by default are the ones that Adobe believes we're most likely to need open anyway, so they went ahead and opened them for us. The palette shown at the top of the page, for example, is the Layers palette, definitely a good choice when it comes to palettes we'll need open anyway. Other palettes opened for us by default are the History palette, the Color palette, and the Navigator palette. It's also worth noting that the Tools palette on the left of the screen is, as the name implies, a palette, even though it's long and narrow and looks nothing like the others. And the Options Bar at the top of the screen, directly beneath the Menu Bar, is also a palette. Both are listed as palettes with the others in the Window Menu of the Menu Bar.

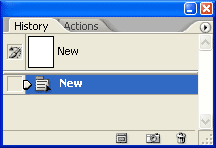
Photoshop's History Palette, with the Actions palette hiding behind it.
The screenshot above is of Photoshop's History palette. You can tell the name of the palette by the tab at the top. Notice though that hiding behind the History tab is what appears to be another tab, this one saying "Actions". Could that be another palette hiding behind the History palette? Why yes it could! In fact, that's exactly what it is.
One of the many ways that Adobe has come up with over the years to maximize the screen real estate in Photoshop is to enable us to group palettes together. We can move palettes in and out of groups manually ourselves as we see fit, but the palettes that Photoshop opens for us by default in Palette Alley also come with other palettes grouped with them, hidden in the background, waiting for us to click on their names and pop them into the spotlight. The Actions palette is one of them.

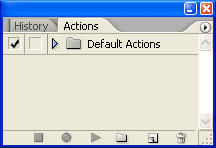
Photoshop's Actions Palette now moved to the front, with the History palette now in the background.
As you can see now in the screenshot above, I've gone ahead and clicked on the name tab of the Actions palette, allowing it to come forward so I can work with it, while the History palette has moved into the background, waiting patiently for me to call it forward once again. Fortunately for the History palette, I tend to make quite a few mistakes while I'm working, so it never has to wait very long for us to be best friends once again. When I do need it of course, all I have to do is click on its name tab, and it will replace the Actions palette as the palette in the forefront.
This action (no pun intended yet again) of clicking on the name tabs of palettes which are grouped together in order to bring them to the forefront is true not only of the History/Actions group, but of any group of palettes. The Layers palette comes grouped, by default, with the Channels and Paths palettes, and clicking on the name tab of either the Channels or Paths palette will move that palette to the front and send the Layers palette to the background. Same with the Colors palette, which comes grouped with the Swatches and Styles palettes, and the Navigator palette, grouped with the Info and Histogram palette.
As I mentioned, you can group and ungroup palettes yourself, and it's very easy to do. Simply click on a palette's name tab and then drag it over another palette group. When you see a highlight box appear around the palette group you're dragging the palette over, lift your finger off the mouse and the palette will snap into the new palette group.
You can also remove a palette from a group entirely and have it appear on its own by once again clicking on the palette's name tab, then dragging it out of the group and away from any other palettes. When you lift your finger off the mouse, the palette will appear all by itself. If you want, you can then drag other palettes into it to create a brand new group. Just click and drag their name tabs over the palette, release the mouse when the highlight box appears, and the palettes are grouped. It's as simple as that. You can drag as many palettes as you like into a group. In the screenshot below, just for fun, I dragged all eleven palettes from Palette Alley's default palettes into one single group.

All of the default palettes from Palette Alley, grouped together. Don't try this at home. Well, okay, you can try it if you like.
0 comments:
Post a Comment